It all started by a chance comment from my brother, “Have you tried turning a ball by…?”

The sides are jointed square to the base
No, I had not tried that technique. Encouraged by his urging, I decided to see what I could do. The trick is to establish two axes at right angles to each other that will meet in the middle of the ball. And that is the trick! Your axes must be 90 degrees apart and they must meet. Slight variations in either consideration show up as defects in your “spherical” turning.
So, here is my approach. Start with a limb or dimensional lumber and joint three sides square. Be as particular as you can with this step. It will help you get better results.
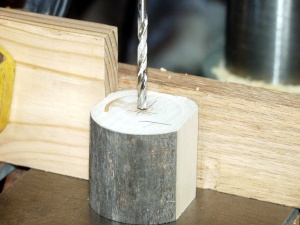
Mark and center the hole in the end of the blank
Cut the stock into lengths that are just longer than the width between the flat sides. Mark one end with a “T” for top and the middle surface with an “F” for fence. Mark the middle of the top and the middle of one side (not the F side).
Position a fence and a stop on the fence to cause you to drill a 3/16 inch hole from end to end through the center when F is against the fence. (3/16 inch because that will accommodate my screw chuck.)
The fence and stop are especially useful if you preparing multiple blanks.

Position the block to drill on the centerline
Turn the block, keeping F against the fence and position the stop so you will drill on the centerline you marked above. These holes should meet in what will become the center of your sphere.

Turn a cylinder and round over the tailstock end
Screw the block on to the screw chuck from all possible positions. If you attempt to start cutting those threads in the wood later, you can cause your forming sphere to split. Then, with the blank screwed onto the chuck so the grain is running lengthwise, turn a cylinder. I like to round over the tailstock end, reverse the cylinder and round off the other end.

Mount the cylinder crosswise on the screwchuck
Then mount the cylinder crosswise on the screw chuck. Make dark pencil marks running the length of the cylinder. These will show up as circles when the lathe is running until you have cut them away. Turn on the lathe and you will be able to see the sphere. Turn the tailstock end to a spherical shape, just cutting away all pencil marks.

The sphere is nearly complete
Reposition the blank and repeat the process. Sand and you should have the completed sphere.
What are you to do with such a sphere? My next post will be about a novel idea I came across some years ago that makes use of your sphere and a few scraps of wood to make a towel holder.
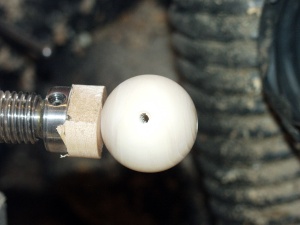
The sphere